May 29, 2012

Time for School Year Reflections

During the last week of school, I think it's important for students to reflect on what they've learned and how they've grown during the school year. I created this School Year Reflections printable as a convenient and fun way to have students think about the school year. It asks them to reflect on what they learned, tell what they thought was the best part of the year, describe an accomplishment that makes them proud, and so on.

I always loved reading these forms at the end of the year, and I used some of the information on them to create my end-of-the-year PowerPoint presentation or movie. If you do the Classroom Yearbook project, you could also have them glue these forms to the backs of their pages instead of writing letters.

Coincidentally, a few days after I posted this page on my site, I discovered that earlier this month, Rachel Lynette of Minds in Bloom had posted a great list of 20 End of the Year Reflection Questions. I thought you might like to customize my School Year Reflections form by using some of her questions, so I created a blank copy of the form for that purpose. When you click on the School Year Reflections printable above, scroll to the second page to see the blank version. Print it and write in your own questions.

What are your favorite reflection questions to use with your students? Have you used any that are not listed here?


May 27, 2012

Host a Classroom Scrabble Tournament!

Do you like to play Scrabble? If so, imagine how much fun you'll have teaching your students how to play! Scrabble is a classic word game, but it's become popular again in part because of iPad and computer apps that allow you to play with friends around the world. It's fairly easy to set up a classroom tournament, an event that will keep your students completely engaged during the last days of school. You can find all the files I reference below on my Odds N Ends page on Teaching Resources. Even if you don't want to set up a tournament, you can still teach Scrabble to your class as an educational game and a fun way to wrap up the year. To use the game in the classroom, you'll need one Scrabble game for every four students. You can purchase 6 games together as a School Scrabble kit, but usually you can ask kids to bring in games from home and that works fine.

Introducing the Game
Before you actually start the tournament or allow students to play on their own, be sure to teach the rules of the game. Don't assume that kids know how to play, even if they own a game board. Most kids today don't seem to know the basic rules of the game, let alone the finer points. Oh, they'll tell you they know how to play, but, trust me, they don't! You can introduce the game by displaying the Scrabble Practice grid on a whiteboard or showing a real Scrabble board with a document camera. It’s not exactly like the real board, but it’s close enough for an introduction.

Draw out 7 letters for yourself and 7 letters for the class. Write the class letters in huge blocks on the board with the number values clearly shown. Play against the class play and write the words for each round directly on the board. Use this as an opportunity to clarify the rules of the game. On the first day that you introduce the game, don’t worry about calculating the scores properly. However, before starting your tournament or letting them play alone, be sure to teach students how to keep score using the proper point values for each letter and the values on the board. If you have the computer version of Scrabble, set up a projector and let your class play against the computer by working in cooperative learning teams. Students in teams can put their heads together to come up with a word to beat the computer. Call on each team to share their word and let the team with the best word come to the computer and play it. If you don’t have the computer game, plan for them to play a practice round before starting the actual tournament.
Hosting a Scrabble Tournament
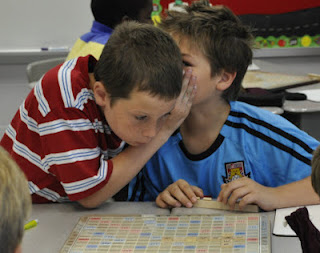
When setting up my Scrabble tournament, I found it best to divide my class into pairs of students who competed against each other. I always paired students who had excellent word-building skills with students who needed some help. They were allowed to whisper and discuss their word choices together when playing. Here are two of my boys consulting about their Scrabble strategies! I have to say that looking at that picture brings back some great memories!

The way I set up my tournament was to have students rotate to a different table each day for three days. I created a Scrabble Board Assignments seating chart to help me keep track of who went where each day. They earned points based on whether their team won the round, lost the round, or tied (had scores within 10 points of each other.) On the 4th day, the top two teams played off to determine who was first place and second place, the next two teams played to determine third and fourth, and so on. You can find the complete directions for setting up the tournament on my Odds N Ends page on Teaching Resources.

Be sure to allow plenty of time to introduce the game, and at 4 days for the actual tournament. My students loved learning to play Scrabble, and the tournament was a hit every year that I hosted one! I hope your students enjoy it as much as mine did!


May 23, 2012

How to Create a Classroom Yearbook


One of my very favorite projects at the end of the school year was to have my students create a classroom yearbook, which was essentially a giant scrapbook. The project was easy and fun, and my kids really enjoyed looking through all of the scrapbooks from years past. Each student created one page in the scrapbook, and we had a design contest for the front cover of the book. In addition, each scrapbook contained about 10 pages of collages of pictures I had taken throughout the year.

I have a whole box of class scrapbooks like the one shown on the right, and I love taking them out and remembering the students I taught years ago. Each student wrote me a special letter that was glued on the back of his or her page, and it's a joy to reread them!

If you haven't done this project with your students before, give it a try! I think you'll find it to be a great way to wrap up the year. Here are my step-by-step directions and tips for guiding your students through this project. You can download the basic directions from my Teaching Resources website along with the Letter to My Teacher template.

Materials Needed:
  • 12” x 12” heavy white drawing paper or scrapbook paper
  • an assortment of colorful and/or patterned scrapbook paper
  • lined paper or "Letter to My Teacher" template
  • rubber cement or scrapbook adhesive
  • photos of students and class activities
  • markers, crayons, and colored pencils
  • scissors (scrapbook scissors are fun!)


Suggested Procedure:
  1. If possible, show students an example of a family scrapbook. Point out details about the arrangement of pictures and elements on the page. If you have scrapbooks from previous years, let students look at those to see examples of how the pages look.
  2. Tell students they will be designing their own scrapbook page, front and back. The front will include their name in fancy letters and a photo of themselves. On the back they will write a letter to you telling you their feelings about the school year. 
  3. Give each student piece of scrapbook paper on which to create their page. You may also want to give them a practice page to test out lettering methods, scissors, colors, etc. 
  4. Allow students to choose one or two piece of scrapbook paper for creating borders and other elements. They should only need 1/2 sheet of each. 
  5. Help students cut their borders, photos, and other elements as needed. Make sure they have their first name in large letters somewhere on the page along with a photograph. The example shown above is the one my daughter Wendy did the year she was in my class. I love how she cut out her picture and put herself on the back of a horse! 
  6. Ask students not to glue anything down until they have cut out all elements and arranged them on the page. Remind them to leave about an inch margin on the left side that's free of words and images to allow for binding. You may want to do the gluing yourself to be sure everything is in place properly.
  7. Have students write their letters to you on lined paper or on one of the pages of the Letter to My Teacher template. There are several variations with different line spacing and in different sizes. Allow students to choose partners who can proofread and help edit their letters. Glue each student's letter on the back of his or her page.
  8. Let your class decide on a name for the yearbook. It might be “Mrs. Candler’s Class Yearbook,” “Candler’s Crazy Kids,” or something similar. 
  9. After you have selected a name for the yearbook, have a cover design contest. Give any student who wants to enter the contest a sheet of 12 x 12 paper and time to work on their designs. Remind them to include the name of the scrapbook and the school year. When all designs are complete, have a secret ballot vote to select the winning design. 
  10. Select a small group of students to create pages with your photos of classroom activities. I often have them work on this part while others are working on cover designs.
  11. When all pages are complete, laminate them and bind them with a strip of large plastic comb binding. If your school doesn't have a binding machine, you may have to take it to an office supply store to have this done. 
  12. Be sure to allow plenty of time for students to look through their class scrapbook. It's best to have them sit on the floor and open in it their laps or open it flat on a large table. I know from experience that if it's handled roughly, it will fall apart. 
Creating a class scrapbook is a great project to end the school year. Best of all, you'll have a wonderful book of memories to remind you of your special time together! Have you ever had your class create a yearbook or scrapbook? How was your project different from this one?

May 20, 2012

Teaching Kids to Accept Responsibility for their Choices


This post has been moved to my new blog on Teaching Resources. If you weren't automatically redirected, click here to read the article and find the free graphic organizer.

May 16, 2012

Classroom Awards Make Kids Feel Special!

Classroom Awards Tips and Freebies!

Most schools have some sort of award program at the end of the year to recognize students for achieving the Honor Roll, having perfect attendance, or excelling in other areas. Most of my students received an award, but there were always some who didn't receive anything at all. Typically these children were the very ones who had struggled all year and who were facing difficulties and a lack of parent support. I couldn't help but feel sorry for them.

So I decided that our classroom would have its own awards program and that every student would get some type of award. I was not trying to diminish the importance of the schoolwide awards, but simply to acknowledge that all of my students were special in some way and deserving of some type of award.

A Unique Award for Each Student
I worked with the class to brainstorm a list of unique awards such as, "Super Reader Award," "Sharing & Caring Award," and "Animal Care Expert." We chose not to include silly things like "Class Clown" because we wanted everyone to feel valued and appreciated. The students nominated their classmates for these awards, but I always made the final decision for each award and kept it a secret until the last day of school. Here's a list of some of the awards we came up with.


I invited the parents to come to my classroom immediately following the school award program for a special celebration. I showed them a short video of pictures I had taken throughout the year and then I announced each award and presented it to the deserving student. I loved seeing them beam with pride when they came up to receive their certificates!

I hope you'll consider having a Class Award Program for your students. I've written out exactly how I set up my program, but feel free to modify it for your own needs. You can find all the materials described below on my Seasonal Page on Teaching Resources


Classroom Award Program Suggestions
    photo of Classroom Award Nomination Form
  1. Display the list of Classroom Awards shown above and brainstorm additional ideas that are specific to your classroom. Add your classroom ideas to the bottom of the list.
  2. Give each student a Classroom Award Nomination Form which is nothing more than a class roster with room to write in the award nominations. It saves time if you write in your students' names before you duplicate the copies for your students.
  3. Keep the list of Classroom Awards posted while students write in at least one award nomination for each student. I required them to write something for every single student, even themselves, and I asked them to circle their own name on the form. If they insisted that they couldn't think of something for a certain classmate, I told them they could make up an award. You may have to provide a few minutes of time for this each day over several days because this step does take time.
  4. Collect the completed Classroom Award Nomination Forms and look through them to see if anyone was nominated over and over for the same award. Print a blank copy of the Nomination Form for yourself and begin writing in the award that you feel is most appropriate for each student. 
  5. After you have filled out the Nomination Form with your award choices, print one Classroom Award Certificate for each student and fill them out with the necessary information. I've created two variations of this form and they are both in black and white and color. You can download all four forms from Teaching Resources. Before you duplicate them for the class, you may want to write in the date of the awards program and sign the master certificate. Print an extra form or two in case you accidentally leave out a student or make an error on one of the forms.
  6. Invite parents to your classroom immediately before or after your school awards program. Present each award individually with great fanfare and let your students know just how special you think they are!

By the way, thanks to Michelle Walker of the Creative Classroom blog for the cute yellow border I used on the awards certificate and to Artifex Clipart for the adorable characters on the award list!

Do you present special awards to your students at the end of the year? If so, what are some of the Classroom Awards that you present? Please leave a comment to let us know!


May 9, 2012

Green Court Claims Freebie

Common Core Aligned for Reading Informational Text and all Speaking & Listening Standards

About a month ago, I shared a special activity I developed for Earth Day called Green Court Claims. You can read my blog post, "Green Companies? Let the Jury Decide!" for a full explanation of the activity. For now, I'll just share that students investigate companies' claims that their products are "green" or earth-friendly. Students research the facts behind the claim, discuss the arguments on both sides, and present those claims to their classmates. Their classmates become the jury and decide whether those claims are valid in order to reach a verdict. You'll find everything you need in this free lesson packet on my Science page on Teaching Resources. You'll find the Common Core Alignment details at the back of the packet.

The first time I shared Green Court Claims, it was completely untested in the classroom. The only reason I shared it without testing it was because Earth Day was fast approaching and I felt it would be a perfect activity for that special day. So I asked a few bloggers to test out the lesson with their students, and Mandy Neal of Teaching with Simplicity immediately offered to try it with her 4th grade class. I was excited to learn that her class loved it, and that she felt it was a really worthwhile experience for them. You can read about their green claim investigations in her blog post, "You Be the Judge."  After I was assured that everything worked out as planned, I compiled all the directions and student printables in one packet to share with you.

You'll find this activity along with loads of other free materials on my Teaching Resources Science page. Even if you don't teach science, I think this lesson would make a terrific class activity for a study of propaganda, or an excellent jumping-off point for a lesson on writing persuasive essays. If you use the lesson, I'd love for you to return and leave a comment to share how it worked for you. What "green" claims have you read or seen recently that you suspect are not particularly friendly to the environment? When you start looking for them, they are easy to find!


Laura Candler
Teaching Resources

May 7, 2012

Create Mother's Day Word Clouds

Why not have your students create Wordles, or Word Clouds, for their moms for Mother's Day? You can use the directions in this Character Word Cloud freebie but instead of having your students create them for a book character, they can use words that describe moms.

Make sure they understand that the more times they write a word, the larger it appears in the word cloud. So if they want to have the word "Mom" or "Mother" as the largest word, they should type it many more times than the other words. Use the directions in this freebie to have them create a Word Cloud, but instead of the usual character trait words, have them think of words to describe mothers, such as loving, thoughtful, resourceful, and so on. You might even want to begin the lesson with a short brainstorming session to generate a list of words and have students choose no more than 8 to 10 for their final product.

The end result might look like the Wordle on the right. Your students could print it and include in a card or use it to create a laminated placemat or other project. Be sure to check their work for spelling errors before you allow them to print it!

You can download the Character Word Cloud freebie from my TeachersPayTeachers store. You can also find my free Mother's Day Coupons there. I hope you enjoy both of these resources!


Laura Candler
Teaching Resources

May 4, 2012

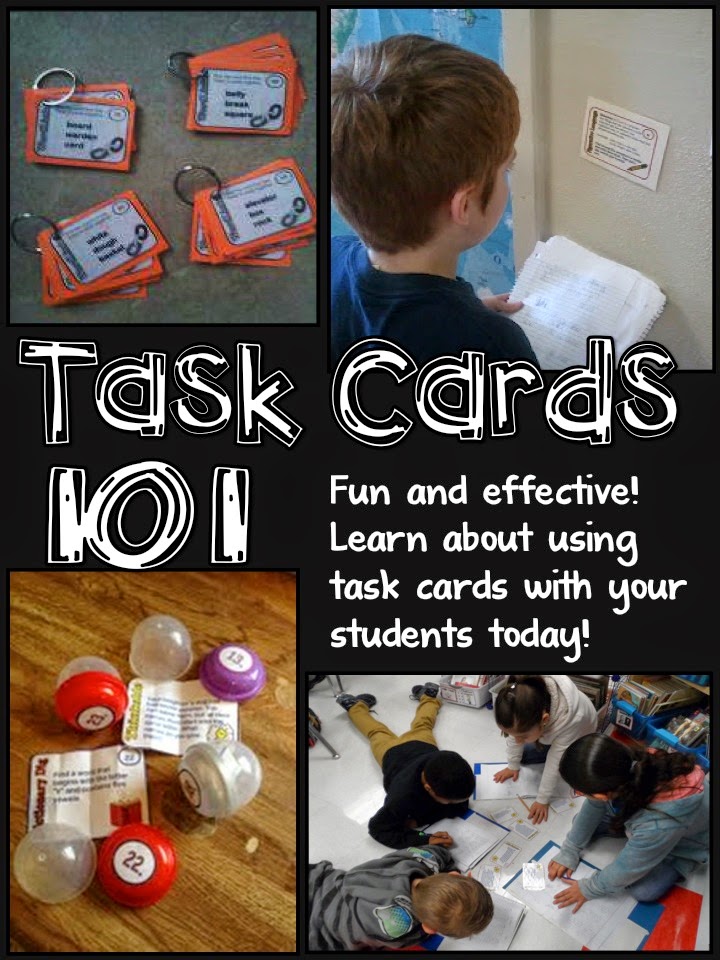
Task Cards 101

Today I'm trading blogs with Rachel Lynette of Minds in Bloom. I wrote a blog post for her on Cooperative Math Problem Solving, and she wrote this one for me! She's the task card queen, so I asked her to share some tips for using task cards effectively. You'll love these strategies! 

Have you been  hearing a lot about task cards lately, but are unsure about how to utilize them  in your classroom? Well, then I have some good news for you! First, it is easier than you might think, and second, once you start using them, you and your students will be hooked!

A task card is exactly what it sounds like: a card with a task on it. Task cards come in sets so that you can target a specific skill, standard, or subject area. One way to think of task cards is as an alternative to worksheets. Student rarely get excited about worksheets, but they love task cards! The one-task-per-card format keeps students from being overwhelmed and allows them to feel a small sense of accomplishment as they complete each card.

Bright, colorful, and laminated, they are appealing both visually and tactilely. Further, they save paper, big time! Copy and laminate once, use for years. Students answer on a single answer sheet, notebook paper, or even individual white boards.

Here is a free set of Antonym Task Cards so you can see for yourself. This is a set for Grades 4 -6, and if you need something easier, you can download the free set for Grades 2 and 3.


How to Use Task Cards
So, now that you know how awesome task cards can be, how can you use them with your students? That is where the fun begins. Task cards are much more versatile than worksheets and can be used in a variety of ways. Here are three options:
  1. Learning Centers - One of the most popular ways to use task cards is at centers. Students can use sets individually or in groups by passing the cards around. You may also want to have students work in partners with one partner checking the other partner's answer. If you provide an answer key, students can self-check their work. Another option is to write the answer directly on the back of each card.
  2. Independent Work - Students could also work individually by taking a set of card to their desks, or even home as homework. This can be an ideal option for your high-end students who might need a little extra challenge as well as for your struggling students who need more practice with a given skill. Task cards make differentiation easy because you can decide which set is appropriate for each of your students.
  3. Whole Class - Another way to use task cards is with your entire class. You could display cards one at a time on the document camera and have students answer on white boards. Have students hold up their boards so that you can scan the room to be sure everyone is answering correctly. You could also put one card on each student's desk and have students rotate with clipboards, completing each task as they move around the room (one version of this is the game Scoot). Allowing students to randomly select a card to complete is a great way to use cards that have longer tasks - such as writing prompts.

Want to learn more about using task cards? Please download my free Task Card Handbook. It has everything you need to know in one handy resource!

Ready to try using them in your classroom? You can download a variety of free task cards sets from my Totally Task Cards blog free resources page.

What is your favorite way to use task cards? Please share with a comment.


Rachel Lynette is the author of the Minds in Bloom blog as well as over 100 nonfiction books for children of all ages. You can find more task cards as well as many other highly rated teaching materials on her blog.